How to Prompt AI for Ecommerce Product Images (Shoes, Hoodies, and Models)
Learn how to think and write prompts for ecommerce product photography using AI image generators. Covers shot types, model consistency, apparel rules, and how SceneSKU automates the whole process.
A question comes up constantly in communities like r/PromptEngineering:
“Can anyone guide me on how to think and write prompts to generate product images from existing article images like shoes and hoodies? Especially with models?”
It is a good question, and the answer is not obvious. Most people’s first attempt looks something like this: “A white sneaker on a clean background.” The result is technically correct and commercially useless — a flat, lifeless image that would not survive ten seconds on an Amazon listing page.
The problem is not the AI. The problem is the mental model.
This post will teach you how to think about ecommerce product prompts the way a creative director would, walk through the eight shot types every serious product listing needs, and explain the specific rules that separate prompts that work from prompts that produce distorted garbage.
Think Like a Creative Director, Not a Photographer
When a brand like Nike shoots a new sneaker, they do not produce one photo. They produce a set — typically eight to twelve images that each serve a distinct commercial purpose. The hero anchor on a clean white background. A lifestyle shot of someone actually wearing the shoe. A macro close-up that shows the texture of the sole. A flat lay with props. An aspirational street scene.
Each image answers a different question the buyer has.
This is the mental shift that makes everything else click: do not ask for “a photo of a product.” Ask for a specific shot type, placed in a specific context, lit in a specific way.
When you frame it that way, a prompt stops being a description and starts being a brief. And that brief is what AI image generators — Flux, Midjourney, DALL-E — are actually good at executing.
The 8 Shot Types Every Product Listing Needs
These are the eight scene roles that professional ecommerce photography uses, in the order you should produce them. Each has a different commercial job.
1. Hero / Anchor
The main listing image. Clean neutral background, no distracting props, product front and center. For hard goods (shoes, electronics, bags), this is product-only — no person, no hands, no context. For clothing and soft wearables (hoodies, gloves, socks), you can include a partial model or ghost mannequin.
Example fragment: “Three-quarter hero shot of white leather sneakers on a clean light grey surface, soft diffused studio light, sharp focus throughout, no shadows, product only, no person, no props.”
2. Lifestyle Scene
Product placed in a real-world environment where it would actually be used. This is where context sells. A sneaker on a sunlit pavement. A hoodie worn while someone carries coffee through a city street. The product is present but the scene has a life of its own.
Example fragment: “Lifestyle shot of white sneakers worn by a person walking on a tree-lined urban path, warm afternoon light, shallow depth of field, natural candid feel, city background slightly out of focus.”
3. Macro / Close-Up
An extreme close-up that highlights texture, material, or a key design detail. This shot builds trust — it tells buyers the product is real and the quality is tangible. Zoom in on the mesh of a sneaker upper, the stitching on a hoodie cuff, the grain of a leather sole edge.
Example fragment: “Extreme close-up macro shot of the textured mesh upper on a white sneaker, shallow depth of field, sharp foreground detail, soft bokeh background, neutral studio light, no person.”
4. Flat Lay Overhead
Product laid flat and shot from directly above. Works for almost any category and photographs beautifully for social media. Add a few complementary props — shoelaces uncoiled alongside the sneaker, a water bottle and gym towel next to a shoe.
Example fragment: “Overhead flat lay shot of white sneakers laid flat on a light concrete surface, accompanied by a rolled gym towel and a small plant, directly overhead angle, soft natural light from the left, sharp throughout.”
5. Side Profile
A clean side view that shows the silhouette and form of the product. Especially important for footwear and bags where the profile is a key part of the design language. Minimal styling, neutral background, the product does the work.
Example fragment: “Side profile shot of white sneakers on a clean white surface, side-on camera angle, sharp edge-to-edge focus, soft diffused light, neutral background, product only.”
6. In-Use / Action
The product being actively used — hands unboxing it, feet mid-stride, someone pulling up a hoodie. You do not need to show a full person; implied use (just hands, just feet) works well and is easier to prompt without triggering content moderation issues.
Example fragment: “Action shot of a person’s feet mid-stride wearing white sneakers on a wet city pavement, low camera angle, motion implied, shallow depth of field, natural morning light.”
7. Environmental / Aspirational
The highest-production scene in the set. Product actively worn by a person in a premium, lifestyle-oriented setting — a café, a park, a rooftop. For apparel, this scene MUST show the product worn on a person. Draping a hoodie over a chair is not acceptable here; it kills the aspirational feeling and reads as amateur.
Example fragment: “Environmental lifestyle shot of a young woman wearing a white pullover hoodie walking through a sunlit autumn park, warm golden hour light, trees in background slightly blurred, natural confident posture, shallow depth of field.”
8. Daily Use Context
Product shown as part of a realistic, everyday routine — on a desk, in a gym bag, in a commute setting. The goal is relatability rather than aspiration. Show the product fitting naturally into a real person’s day.
Example fragment: “Daily use context shot of white sneakers placed next to a gym bag on a wooden floor beside a locker, soft indoor ambient light, natural and unposed, realistic environment.”
Here is a real SceneSKU scene pack generated from a single product description — a men’s dark navy hoodie with a bold graphic print:
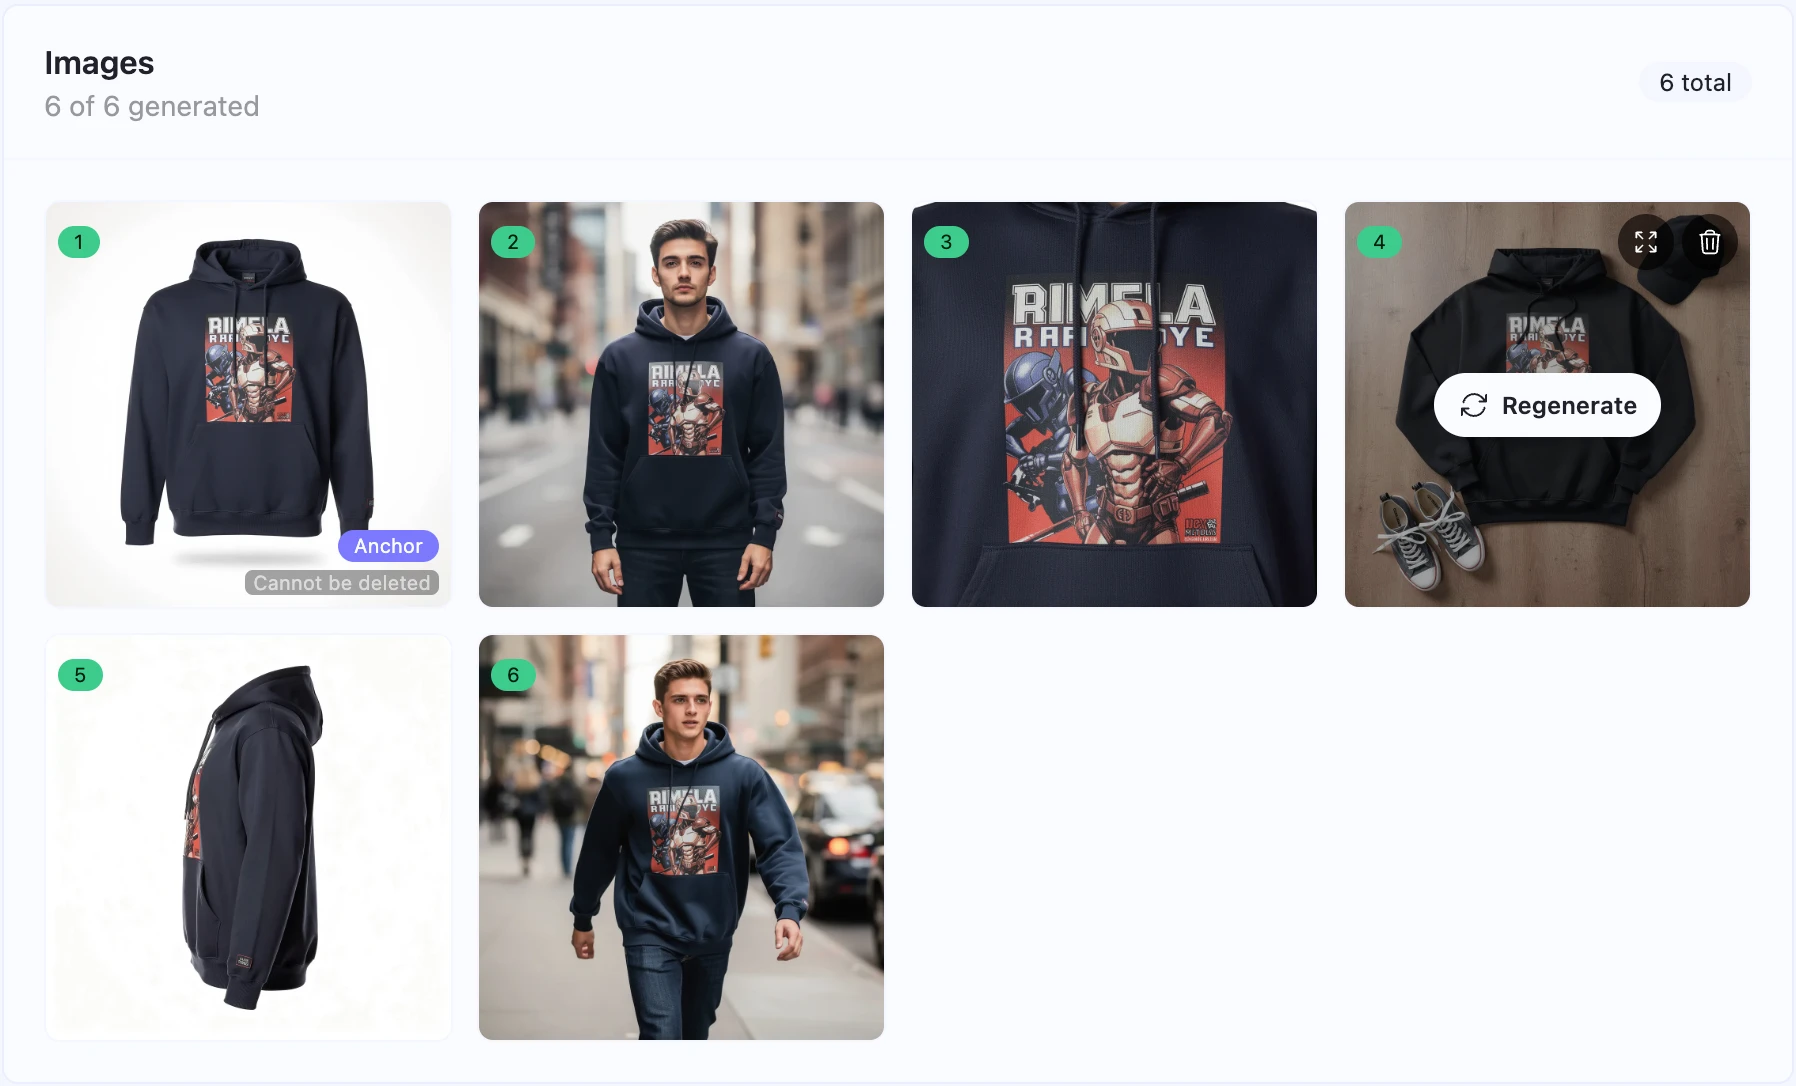
Six distinct images from one input. Each shot type covered, each scene commercially usable on its own.
The Rules That Make or Break Ecommerce Prompts
Getting the shot types right is half the battle. The other half is prompt construction. These are the rules that consistently separate clean, usable output from distorted, commercially worthless images.
Always lead with the shot type. Every prompt should open with a declaration of what kind of image this is: “Overhead flat lay shot of…”, “Extreme close-up macro shot of…”, “Three-quarter hero shot of…” This orients the model immediately and dramatically reduces hallucination.
Name the lighting, specifically. “Good lighting” means nothing to an AI. “Soft diffused window light from the left” means something. “Warm golden hour glow with long shadows” means something. “Bright studio strobe with a clean white fill” means something. Lighting is the fastest way to control the mood and professionalism of a result.
Name the depth of field. “Sharp focus throughout” for product-only shots. “Shallow depth of field with bokeh background” for lifestyle scenes. This single parameter makes the difference between a product photo and a snapshot.
Place products in realistic contexts. This one sounds obvious but AI fails it constantly. Shoes belong on floors, pavement, gym mats, grass, and outdoor paths — never on tables, counters, or shelves. Food belongs on kitchen counters and dining tables, not on floors. Electronics belong on desks and in hands. When a prompt violates physical logic, the output looks surreal in the worst way.
Keep the product visually identical across all scenes. Explicitly describe the product’s defining attributes in every prompt: the same colors, the same materials, the same shape. AI image generators drift. If you do not anchor each scene to the same product identity, you will end up with eight photos of eight slightly different products.
Never name trademarks or branded IP. Do not write “Nike swoosh” or “Supreme box logo” in a prompt. Content filters will block it and the output will be unusable. Instead, write “same graphic/logo as shown in the reference image” — this tells Flux to copy the graphic from your input image rather than invent a new one from training data.
Always write a negative prompt. List the visual failures you want to avoid: “no distortion, no extra logos, no blurry product, no cut-off edges, no additional text, no extra limbs.” The negative prompt is not an afterthought — it is a guardrail.
Apparel and Models: The Part Most Guides Skip
The Reddit question specifically asked about hoodies and models, and this is where most prompt guides fall short. Here is the full picture.
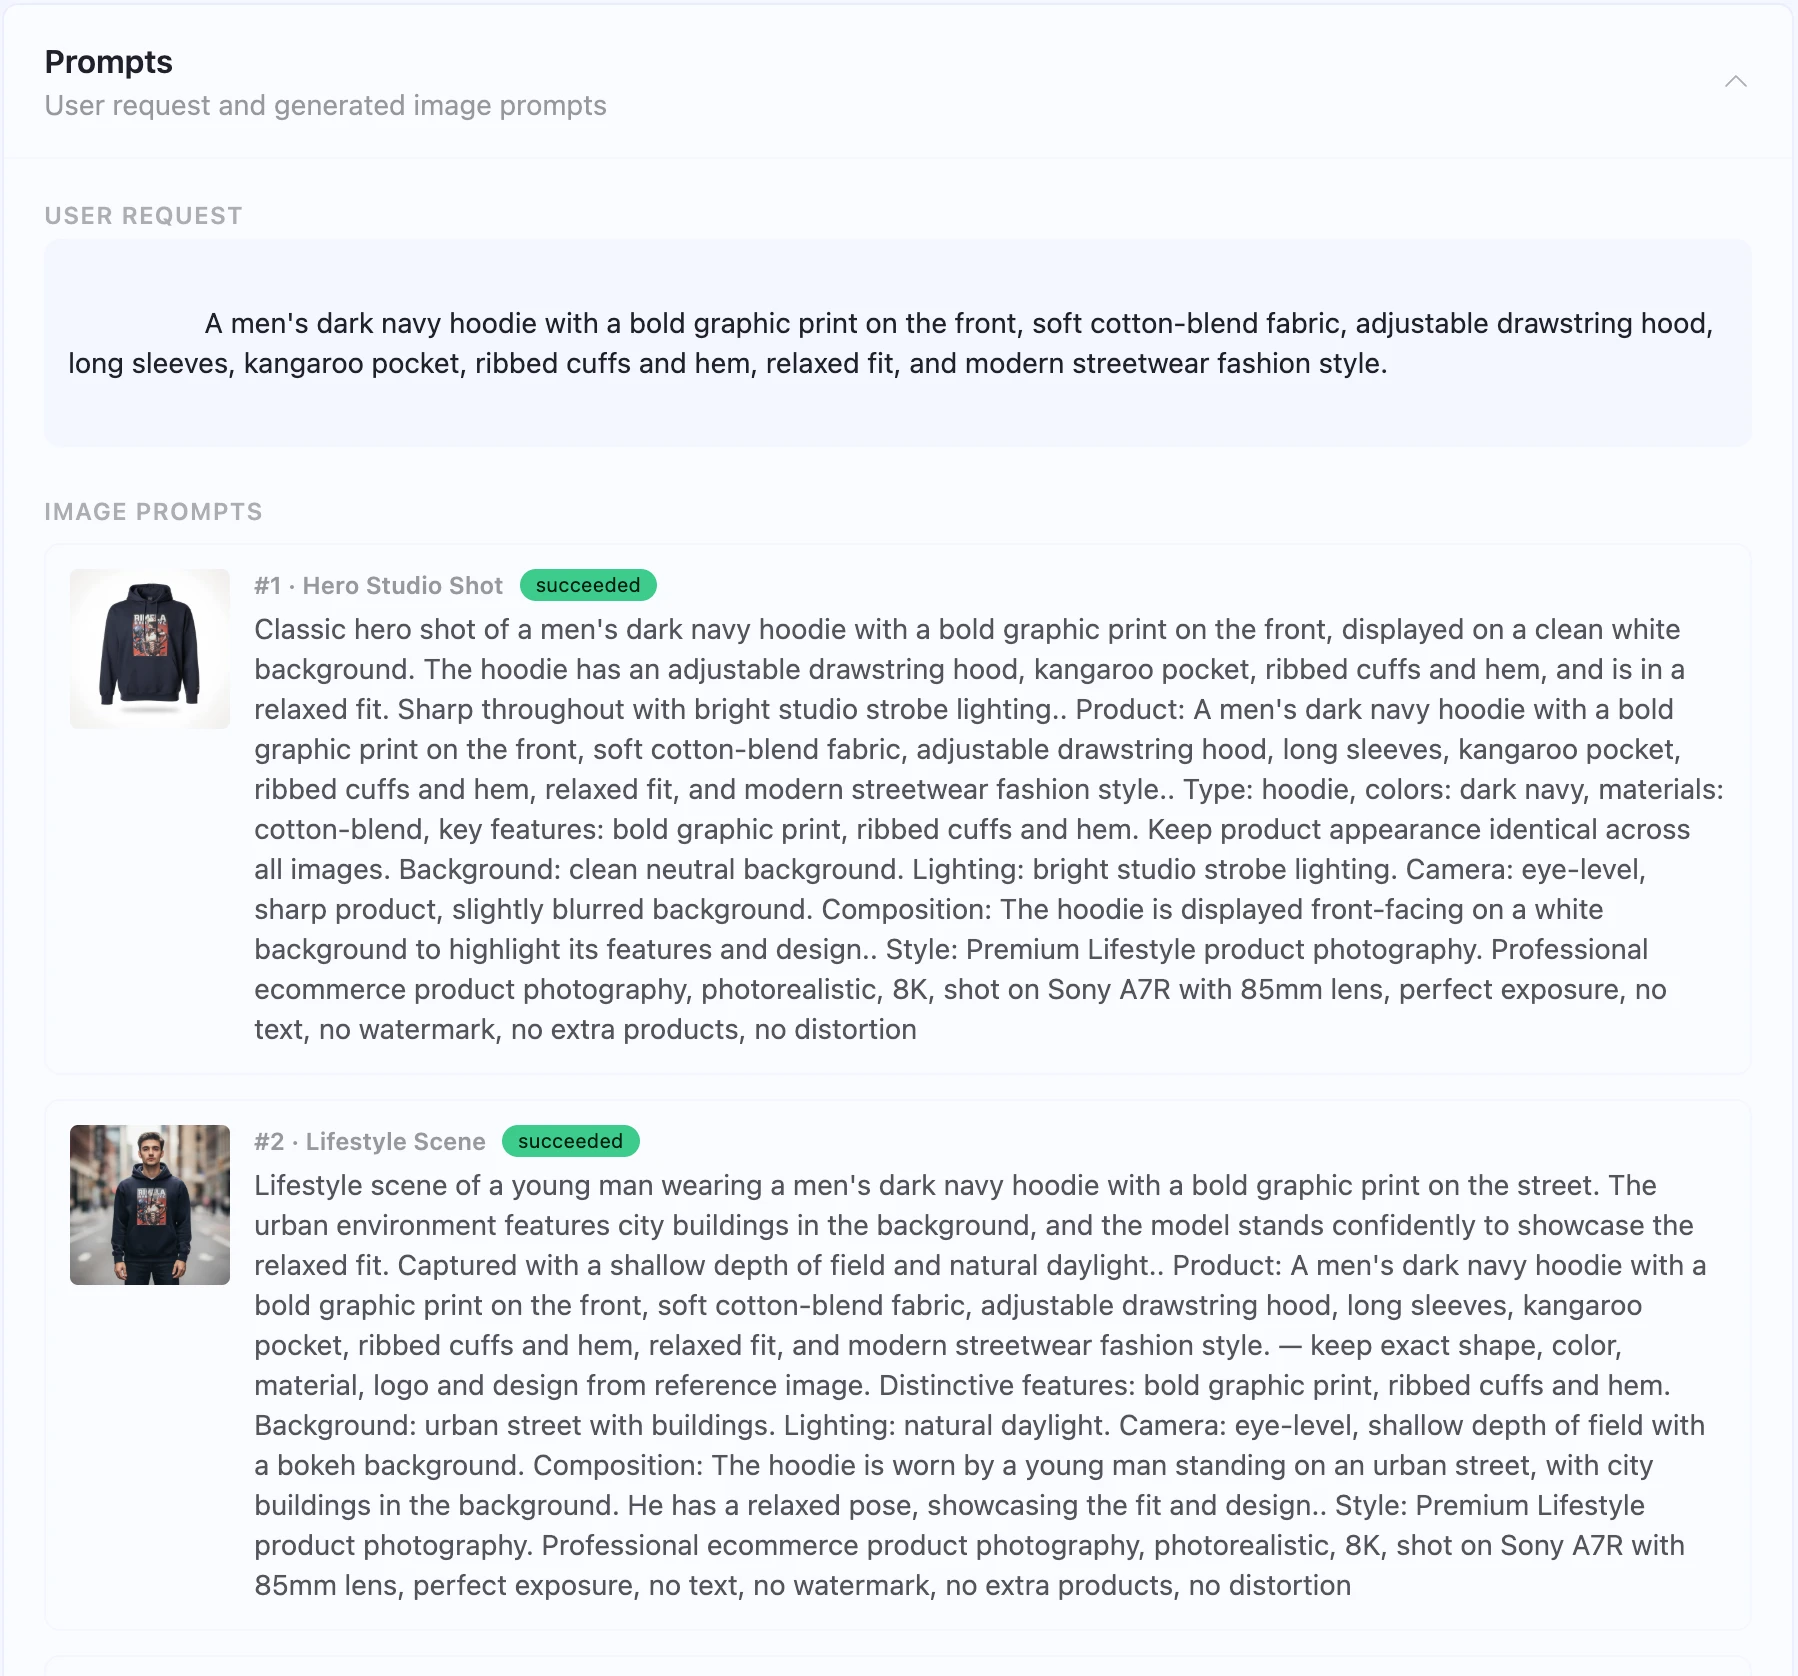
Below are the actual prompts SceneSKU generated for the dark navy hoodie above — starting from the plain-English user request and producing precise, Flux-ready scene briefs:
When to use a model, and when not to. For the anchor hero shot (index 1), clothing and soft wearables can include a partial model or ghost mannequin. Hard goods — sneakers, bags, electronics — should be product-only in the anchor shot. For lifestyle, environmental, and in-use scenes, apparel should always be worn by a person. A hoodie draped over a chair in a “lifestyle” photo is not lifestyle photography — it is a product shot with a chair in the background.
How to prompt for models without triggering filters. Keep model descriptions neutral and non-specific. Write “a young woman wearing the hoodie” or “a male model in a casual outdoor setting” rather than describing facial features or body specifics. Describe the setting, the activity, and the mood — let the AI fill in the person.
Gender consistency matters more than you think. If your reference product image shows a female model, every scene that includes a person should use a female figure. Switching gender between scenes makes the set look incoherent and unprofessional. Check your reference image first, note the detected gender, and include it explicitly in every scene prompt that features a person: “worn by a young woman,” “female model,” “young man wearing.”
Ghost mannequin is a legitimate alternative. If you want to show the fit and shape of a garment without a full model, a ghost mannequin prompt works well: “Invisible mannequin / ghost mannequin shot of a grey pullover hoodie, front-facing, clean white background, soft diffused studio light, no visible mannequin structure, professional apparel photography.”
What SceneSKU Does Automatically
Writing good ecommerce prompts by hand is learnable — but it takes time, iteration, and a lot of failed generations before you build intuition for what works.
SceneSKU’s scene planning engine automates this entire workflow. You upload your product image (or describe your product), select a visual style and background preset, and the AI generates a complete set of professional scene prompts — one for each shot type, with correct placement rules, lighting specifications, depth-of-field instructions, model gender consistency, trademark-safe language, and negative prompts baked in.
The output is not just prompts. It is a full scene pack: structured product data (title, description, bullet points, categories, tags, pricing, SKU options), a visual direction brief, and ready-to-run Flux image prompts for every scene.
Browse ready-made scene packs — free to preview, with full product data and image prompts included — at scenesku.com/packs.
Or see how a complete scene pack populates a real storefront in the live Next.js demo — open-source and free to clone.
Here is what to do next:
- Browse free Scene Packs at scenesku.com/packs — ready-made image sets with full product data included
- See it live in the Next.js Storefront Demo — open-source and free to clone
- Sign up at SceneSKU to generate your own scene packs from your product images